Nothing will compel you to search for documentation like writing it for a living. So that said, documentation did not solve my problem as my brain buzzed with the very specific thing I needed to do (create a short animation set to an audio track, part of which would play on loop, but not the whole thing) and the documentation instead explains what each individual button and parameter does.
Essentially, I wanted task-based docs and I got concept-based docs.
For the official Clip Studio Paint docs, click here.
Well, I will say that after several hours and a surprising amount of swearing, I managed to do the thing I wanted to do. It’s not done, it’s not perfect, and I can’t even really post it because the audio is probably copyrighted (you can see it on my Instagram for now). I’m not a lawyer, I don’t know if this qualifies as fair use, but gosh did I sure spend an inordinate amount of time yelling at my animation software for me to not be able to show anyone what I did.
Anyway, a few useful tricks for animating in CSP.
Enable Animation Cels
In an earlier post, I described a ridiculous process where I always started my animations by dragging the default layer out of the animation folder, adding a folder, and dragging it back down to the animation folder to ensure that I could add new layer types later on.
Well, that is all entirely unnecessary. You can get a handy window that does the same thing in way fewer steps:
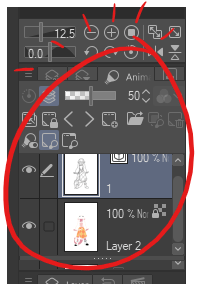
- Navigate to Window > Animation Cells. The animation cels window appears under the navbar.
- Right click between layers in the animation cel pane.
- From the menu that appears, select New Layer > {Your layer type of choice}.
- Do that as many times as necessary.
Play Frames in Real Time to Unmute Audio
By default, Clip Studio Paint is set to play all frames. Unfortunately, for some reason this option mutes audio tracks. So if you’re trying to sync animation to sound then you need to change that setting:
- Navigate to Animation > Playback Settings
- Select Play in real time.
If your RAM and CPU can’t tolerate whatever you are trying to animate, then god help you because I sure can’t.
Add an Audio or Video Track
If you’re rotoscoping an existing video or need to add an audio track, you can’t just drag and drop. You actually need to go to File > Import and select audio for sound and movie for video.
Clip Studio Paint supports MP3s and MP4s.
Looping a Section of Animation

If you can see the timeline, you’ll notice that several frames are repeated, but not the first three frames. This is intentional. I wanted the character to look like she was getting ready before the music picked up. Once the dance started, I only wanted to repeat about 12 frames to conserve some animation effort.
I had no idea how to do this originally, so I had to search for a bit. It’s deceptively easy, but it is, like a lot of things in Clip Studio Paint, not immediately intuitive:
- Draw the series of frames you want to loop.
- Trim the timeline:
- In the Timeline, right click just before the frame you want to start the loop. Select split clip. This divides part of the timeline.
- Remove any excess frames by dragging the right end of the timeline to the last frame you want to use.
- To loop your frames, select the clip (the segment on the timeline you just made) by clicking on the bar at the top of the animation folder. You can now copy and paste the clip on the same timeline.
- Right click, copy, and paste the clip. Repeat as necessary.
There is a lot of not-very-scientific eyeballing involved with this, but if you have the wherewithal to watch the same clip and listen to the same soundbite over and over, you will eventually end up with a cute little dance loop.
Calling it Quits for Now
For now, I’m reasonably happy with the animation enough to call it an evening and write down these processes before I forget. Assuming I have time, I would like to go back in and clean up the last few frames and maybe add a little tiny bit more of a transition.
Because I’m a human being who works a day job and has to sleep occasionally, this is where I’m calling it for now. If you want to further torment me, leave a comment and let me know what feature in Clip Studio Paint you’re confused about and I’ll see if I can’t figure it out.

Leave a comment